Tubelab

Dedicated to advancing the state of the art in affordable high end audio.

  • Designs
    • Tubelab SPP
      • Assembly Manual
        • Getting Started
        • Resistors
        • Tube Sockets
        • Connectors
        • Capacitors
        • Semiconductors
      • Schematic
      • Parts List
      • Tubes and Applications
    • Tubelab SSE
      • Assembly Manual
        • Getting Started
        • Resistors
        • Tube Sockets
        • Capacitors
        • Semiconductors
        • Connectors
        • Wiring Diagrams
        • Checkout
        • Enclosures
      • Schematic
      • Parts List
      • Tubes and Applications
      • Design
      • Simulations
    • Tubelab SE
      • Assembly Manual
        • Getting Started
        • Resistors
        • Tube Sockets
        • Semiconductors
        • Capacitors
        • Final Assembly
        • Checkout
        • Setting the Bias
        • Enclosures
      • Schematic
      • Parts List
      • Tubes and Applications
      • Theory of Operation
    • MiniTron
    • 845 SE
    • 300 Beast
    • Turbo Champ
    • Headphone Amp
  • Prototypes
    • Cathode Follower
    • Super Tube SE
    • The O2 Amp
    • Simple 45
    • 833 SE
  • Construction
    • Industrial Strength Amp
    • Clear Lexan Amp
    • Tubelab SSE Test Amp
    • Customer Builds
  • Articles
    • Ideas
      • Solid State OPT
      • Totem Pole Output
      • Super Tubes
      • Single Ended Output Stages
    • Proven Circuits
      • CCS Circuits
      • Active Loaded SE Output Stages
      • Power Drive
        • Cookbook
      • 845 SE Driver Board
      • 845 Power Supply Board
      • Spud SE Board
      • Universal PP Driver Board
      • Octal Driver Board
    • Tube Testing
      • 6LW6 Sweep Tube
      • 6CD6 Sweep Tube
      • 6AV5 Sweep Tube
    • Component Testing
      • Budget Output Transformers
      • Output Transformers
    • Amplifier Testing
    • Tubelab Prototyping System
    • Tubelab Power Supplies
    • Output Transformers Explained
    • Totally Tubular
      • The First Page
      • My Systems
      • Listening Tests
  • PC Boards
    • Tubelab SPP Board
    • Tubelab SSE Board
    • Tubelab SE Board
    • Ordering
  • Safety
    • Electrical Safety
    • Amplifier Grounding
  • About Us
    • What is Tubelab?
    • Who is Tubelab?
    • About this Site
    • Philosophy
    • Information and Links
    • Feedback

Tubelab SE — Assembly Manual

Table of Contents

  1. Getting Started
  2. Resistors
  3. Tube Sockets
  4. Semiconductors
  5. Capacitors
  6. Final Assembly
  7. Checkout
  8. Setting the Bias
  9. Enclosures


Enclosures

It is possible to simply screw the transformers and PC board to a piece of wood (shown below) for a complete amplifier. This is NOT recommended due to the exposed electricity. I made a thin Lexan cover for the amplifier shown below (with holes for the tubes and large caps) to protect against shock. I have made simple cabinets from wood, and metal. These are all low cost cabinets. The amplifier is designed such that a metal cabinet is not necessary and hum is non existent. The Lexan case shown above works very well and looks good. A second one is under construction using glue instead of screws. Lexan is not cheap, but remnants can be found on Ebay. Do not use Plexiglas, it will deform under the weight of the transformers when it gets hot.

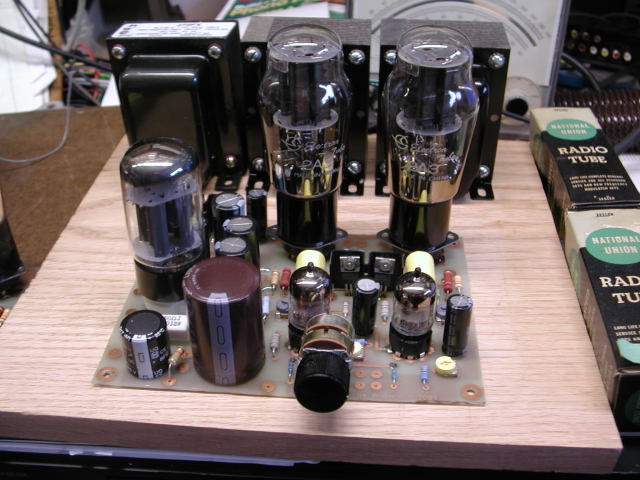
Just add 3 Transformers, a piece of wood, and you have an amp (shown with 2A3's, volume control, the large power supply cap 470uF 450V) output transformers are Electra-Prints. All wiring is underneath the board.

I have built a unique design by mounting the large capacitors on the back side of the PC board. The board was then mounted using 1/2 inch standoffs to the bottom side of an aluminum panel which was punched for the tube sockets and drilled for access to the adjustment pots. The transformers were mounted to the top of the aluminum panel. The panel was then mounted to a wooden base. This amplifier looks like a traditional design from the top, the PC board is not visible. Unfortunately I sold this amp before I photographed it but I have visitation rights. (NOT) The purchaser moved away, and I lost track of it. This is NOT a simple modification, and I don't recommend it for inexperienced builders.

Proudly powered by WordPress Theme: Parament by Automattic.